How can I make my bay tree grow faster? What are the different stages and conditions required to grow a really good bay tree? Why choose a laurel hedge? And finally, why does a laurel hedge sometimes not grow the way you want it to?
I. Different types of laurel
It’s one thing to want to plant a laurel hedge, but another to know which variety is best for your climate. In fact, there are several types of laurel.
For people who don’t like conifers, bay trees are a very popular hedge shrub.
Laurel is generally used in gardens and is very pretty to look at, in that not only is it green most of the time, but it also grows very fast.
The following are just a few examples: Rortundifolia laurel, Novita laurel, Caucasian laurel and Portuguese laurel.
II. How can I make my bay tree grow faster?
To get your bay tree to grow faster, there are a number of things you need to do, following a precise process.
Here’s how you can make your bay tree grow faster:
1. Choosing a plant
If you want your bay tree to grow very fast, you need to make an excellent choice first and foremost. This is very important.
The space you give your plants will be determined by the choice of shrubs. In other words, the choice of shrubs depends on the type of hedge you want to have and the type of protection you want to give your plants.
For example, if you want to create a windbreak hedge to protect your crops from the wind, you can choose shrubs such as photinias or conifers.
These have the ability to retain their leaves throughout the year and are ideal for creating a windbreak hedge.
2. Weeding and soil preparation
It’s time to weed and prepare the soil on which you’re going to plant the shrubs you’ve carefully chosen.
To do this, we recommend that you remove all vegetation for 50 cm on either side of the plants, taking care not to leave the soil bare.
You can cover it with dead leaves, a layer of straw or grass clippings.
3. Planting
You need to plant your shrub well if you want it to develop quickly. We advise you to dig a hole 3 to 4 times the size of the pot or root ball you have.
If you’re planting a hedge over a wide perimeter, you’ll need to dig a trench directly, as this is more effective.
Depending on the density you want, once you’ve dug the holes or dug the rootballs, place them 30-40 cm apart.
Fill the holes or trench with the potting soil you’ve prepared while planting your shrubs.
4. Mulching
As mentioned above, mulching allows you to avoid leaving the soil bare after weeding. But above all, it feeds the soil while you’re waiting for your laurel to go into the ground.
For this reason, we recommend mulching with green waste rather than canvas, as the latter does not nourish the soil.
Also, a well-made mulch not only attracts insects such as earthworms to ensure that the soil is as rich as possible before planting, but also encourages microbial activity.
So, ideally, you should mulch 10-15 cm high and around 80 cm wide of the strip where you’ll be planting your hedge a few weeks in advance.
Note that you can always lay straw around your laurel after planting.
5. Watering
It’s not just at planting that you need to water your plant. You need to continue watering even after planting.
You have to, because not all hedge plants are fully established in their first or second year. And the slightest lack of water not only interrupts their growth but also causes them to suffer.
So you need to provide at least 5 liters of water per plant per week.
6. Fertilizers
You can use fertilizers if you want your plant to grow very quickly. Every spring, for example, you can fertilize your shrub with a complete horticultural fertilizer.
7. Trimming the laurel
Unless you want to prevent your bay trees from reaching a certain height or give them a special shape, there’s really no need to prune them.
It’s worth noting that bay trees can reach heights of between 10 and 20 meters. However, those grown in pots are much lower.
8. Protection of young shoots from the sun
Young laurel shoots are very sensitive to strong sunlight. You’ll need to double your alignment with a windbreak.
This precaution is very necessary on the seashore. By doing so, you also protect them from strong winds and draughts, especially in winter.
If your plot is not enclosed, don’t forget to protect your seedlings from rabbits.
To do this, you can surround the base of the plants with wire netting or any other ploy.
9. Beneficial Fungi – Mycorrhizae
Mycorrhizae are beneficial fungi that can enhance the laurel tree’s nutrient absorption from the soil. These fungi form a symbiotic relationship with the plant roots, extending their absorbing area and releasing enzymes that help dissolve hard-to-capture nutrients.
III. Why choose a laurel hedge?
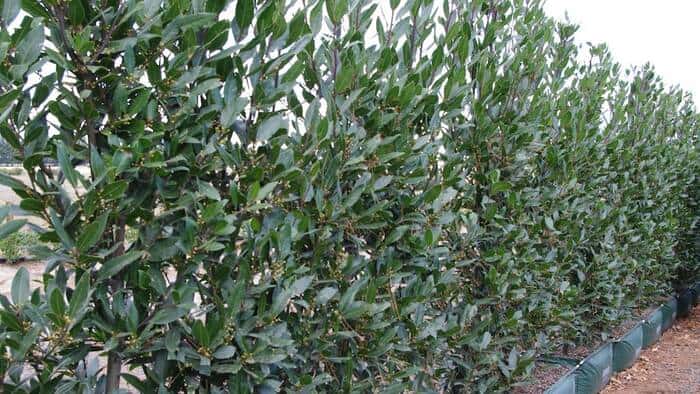
The laurel hedge not only has relatively tough foliage, but also glossy, tall foliage that gives the garden a luxurious character like no other hedge shrub can.
This is one of the reasons why you should choose it.
Planting a laurel hedge also helps combat the air pollution, particulate matter and noise nuisance that comes from nearby freeways.
It also acts as a sort of wall, protecting you from the gaze of others.
IV. Why does a laurel hedge sometimes fail to grow?
There are several reasons why your laurel hedge may not be growing. For example, it could be a vein of poorer or poorly drained soil.
In most cases, the soil is not always homogeneous. This prevents your laurel from developing properly.
V. Other questions on how to make bay leaf grow faster
1. What is the best liquid fertilizer for laurels?
Laurels thrive when provided with the right nutrients, and using liquid fertilizers can be an efficient way to promote their healthy growth and development. Liquid fertilizers are easily absorbed through both the roots and foliage, providing quick nutrition.
Selecting the Best Liquid Fertilizer:
Balanced NPK Ratio: Choose a liquid fertilizer with a balanced NPK ratio, such as 10-10-10 or 20-20-20. NPK stands for nitrogen (N), phosphorus (P), and potassium (K), the three primary nutrients plants need. Laurels require a balanced intake of these nutrients for optimal growth and health.
Micronutrients: Ensure the fertilizer contains essential micronutrients like iron, manganese, and zinc. These elements support various physiological functions in laurels, enhancing their overall vitality and resistance to diseases.
Organic Options: Consider using organic liquid fertilizers derived from fish emulsion, seaweed, or compost tea. These options not only provide necessary nutrients but also improve soil structure and microbial activity, fostering a healthier growing environment for laurels.
Application Guidelines:
Frequency: Apply liquid fertilizer to laurels during the growing season, typically from spring through early fall. Avoid fertilizing in late fall or winter when the plants are dormant.
Dilution: Follow the manufacturer’s instructions for diluting the liquid fertilizer. Proper dilution ensures that the laurels receive adequate nutrition without risk of fertilizer burn.
Method: You can apply liquid fertilizer to the soil or use it as a foliar spray. Soil application nourishes the roots, while foliar application provides quick nutrient absorption.
2. How to Use Bone Meal to Grow Laurels
Bone meal is an organic fertilizer rich in phosphorus and calcium, beneficial for promoting strong root development and flowering in plants, including laurels.
Benefits of Bone Meal:
- Root Development: The high phosphorus content in bone meal encourages robust root growth in laurels. Strong roots are crucial for the stability and nutrient absorption of the plants.
- Flowering: Phosphorus also plays a vital role in flowering. If your laurels are of a flowering variety, bone meal can enhance bloom production and quality.
- Soil Amendment: Bone meal acts as a soil conditioner, improving the soil’s structure and providing essential minerals.
How to Use Bone Meal:
- Application Time: Spring is the ideal time to apply bone meal to laurels, as the plants are entering a period of active growth. You can also apply it in the fall to prepare the plants for the following growing season.
- Amount: Use approximately 1 cup of bone meal per small shrub. For larger laurels, you may need to use 2 to 4 cups. It’s crucial not to over-apply, as excessive phosphorus can harm the plants and the environment.
- Method: Sprinkle the bone meal evenly around the base of the laurel, extending it to the drip line (the outer edge of the branches). Avoid piling bone meal against the stem or trunk. After application, water the area thoroughly to help the bone meal penetrate the soil.
- Precautions: While bone meal is generally safe, it’s essential to follow the recommended application rates and keep it out of reach of pets, as some may find it attractive and try to ingest it.
3. What is the maximum height of laurel?
Laurels are popular plants often used for hedging due to their dense foliage and rapid growth rate. The maximum height of a laurel hedge primarily depends on its specific variety.
Common Laurel Varieties and Their Heights:
- English Laurel (Prunus laurocerasus): This is one of the most common varieties, capable of reaching heights between 15 to 30 feet if left unpruned. With pruning, you can maintain it at your desired height.
- Portuguese Laurel (Prunus lusitanica): Slightly smaller than the English Laurel, the Portuguese Laurel typically grows to heights of 10 to 20 feet.
- Mountain Laurel (Kalmia latifolia): This variety is native to the Eastern United States and generally reaches heights of 7 to 15 feet.
- Bay Laurel (Laurus nobilis): Often used as a culinary herb, Bay Laurel can grow up to 60 feet tall in ideal conditions but is often kept much smaller when cultivated.
4. How close to a fence can I plant a hedge?
Planting a hedge near a fence requires careful consideration to ensure that both the hedge and the fence remain in good condition over time.
Distance Considerations:
- Root System: Understanding the root system of the hedge plants you choose is crucial. Some plants have expansive root systems that might interfere with the fence’s foundation, potentially causing damage over time.
- Growth Habit: Consider the width and growth habit of the hedge plants. Planting them too close to the fence might result in the plants growing through or over the fence, which might not be desirable.
General Guidelines:
- Small Shrubs: For smaller hedge plants or shrubs that will be kept short, a distance of 1 to 2 feet from the fence should be sufficient.
- Medium to Large Shrubs: For larger shrubs or those that will grow taller, consider planting them 2 to 5 feet away from the fence. This distance provides enough space for the plants to grow without interfering with the fence.
- Maintenance Access: Ensure there is enough space between the hedge and the fence to allow for maintenance activities like pruning, watering, and fertilizing. This space is also crucial for fence repairs or painting.
Practical Tips:
- Check Local Regulations: Some areas have specific regulations regarding planting near property lines or fences. It’s wise to check these rules to avoid any legal issues.
- Consider the Fence Material: Different fence materials might have different requirements. For example, a wooden fence might require more space compared to a metal or vinyl fence due to potential moisture-related damage.
- Plan for Future Growth: Plants will grow and expand over time. What might seem like enough space now might not be sufficient in a few years. Planning for the future growth of your hedge is crucial to avoid potential problems down the line.
Useful Links:
Sage, Rosemary, and Bay Laurel Hydrodistillation By-Products as a Source of Bioactive Compounds